ECHO SRC / Upsampling Guide
This guide is for anyone who wants to use the built-in upsampler in ECHO Next. Upsampling here means the on-device PCM sample-rate conversion under DSP -> ECHO SRC / Upsampling. It is not HQPlayer, and it is not PCM-to-DSD conversion.
One sentence to remember first:
Upsampling is advanced DSP, not sound-quality magic. Make sure your computer, DAC, drivers, and exclusive output are stable before you turn it on.
Confirm three things before enabling it
Section titled “Confirm three things before enabling it”You need enough compute
Section titled “You need enough compute”Upsampling calculates new PCM samples in real time. Higher ratios, longer filters, and more aggressive quality policies mean more CPU / GPU load.
| Setting | Hardware demand | Advice |
|---|---|---|
2x PCM | Light | Fine starting point for laptops and ordinary desktops |
4x PCM | Moderate | Recommended starting point; balances stability and effect |
8x Ultra | High | Needs a stable CPU, driver, and DAC; do not make it your default at first |
| Advanced Filters / CUDA | High to very high | Only after basic upsampling is confirmed stable |
If you hear pops, stutter, noticeably slower track changes, or repeated fallbacks in the playback state, lower the ratio first instead of stacking heavier filters.
You need a dedicated DAC
Section titled “You need a dedicated DAC”Upsampling is best suited to wired external DACs, USB decoders, sound cards, or dedicated audio devices with stable drivers. Do not try to validate it with Bluetooth headphones, Bluetooth speakers, monitor audio, or laptop speakers.
The reason is simple: the upsampled high sample rate ultimately has to be received by the device. Without a dedicated DAC or stable sound card, the system mixer, Bluetooth codecs, device firmware, or virtual sound cards can re-process the result — the numbers you see on screen may not be what actually reaches the DAC.
Exclusive output is required
Section titled “Exclusive output is required”To verify ECHO SRC is really taking effect, use:
WASAPI Exclusive- or the official
ASIOdriver from your DAC / sound-card vendor
Do not validate upsampling with WASAPI Shared or System. Shared output goes through the Windows mixing chain, the final sample rate may be decided by the system default format, and ECHO SRC may be bypassed. Shared mode is fine for everyday listening; for verifying upsampling, use exclusive or official ASIO.
Shortest recommendation
Section titled “Shortest recommendation”For a first run, set things up like this:
Output mode = WASAPI ExclusiveOutput device = your dedicated DAC / sound cardECHO SRC = 4x PCMQuality policy = BalancedControl mode = NormalAdvanced Filters / CUDA = leave aloneDSD / SDM / HQPlayer = offPlay for 30 seconds to a minute. If there are no pops, no stutter, and track changes work, then consider higher ratios or more complex filters.
Where to find it
Section titled “Where to find it”- Play a local FLAC / WAV / MP3 first and confirm basic playback works.
- Open
DSPin the left navigation. - In the
Sample Rategroup, enableECHO SRC / Upsampling. - Keep the control mode on
Normalfor now. - Choose
4x PCMas the ratio. - Choose
Balancedas the quality policy. - Confirm the output is already
WASAPI Exclusiveor officialASIO.
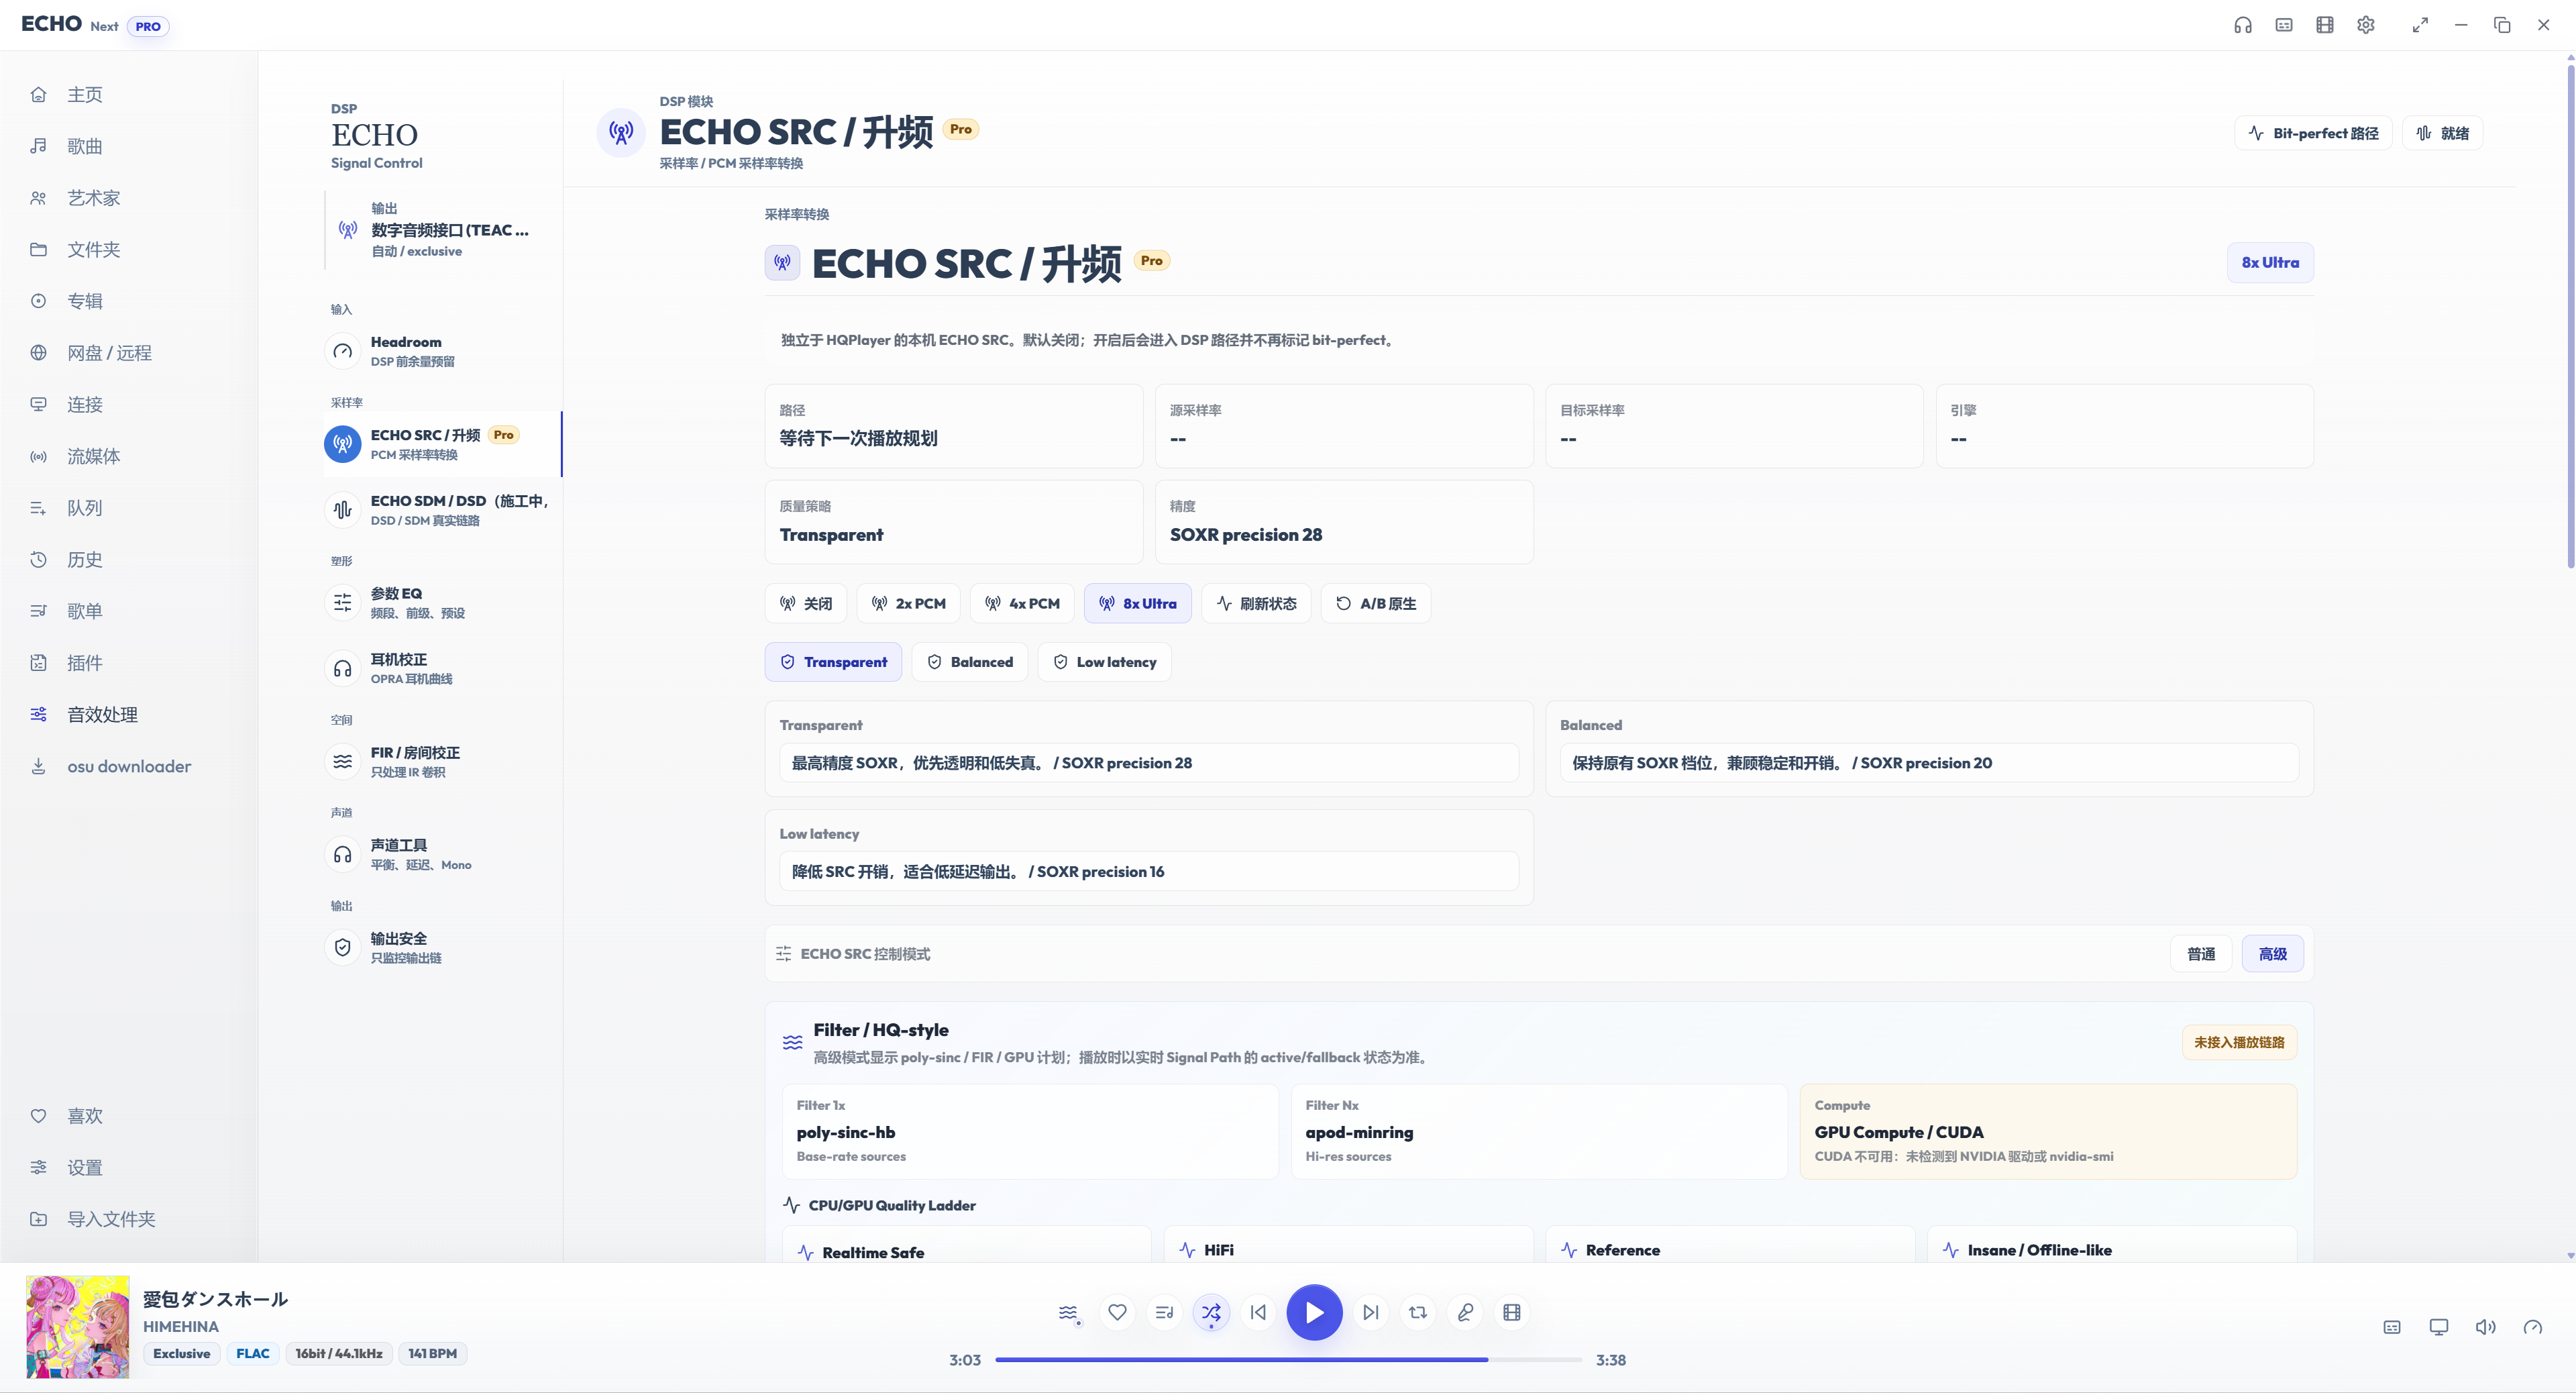
The top of the page shows the current path, source sample rate, target sample rate, engine, quality policy, and precision. Seeing “waiting for next playback plan” right after changing settings is normal — check the actual state after switching tracks or restarting playback.
Choosing a ratio
Section titled “Choosing a ratio”ECHO SRC converts upward within the 44.1 kHz and 48 kHz families. Typical results:
| Source | 2x PCM | 4x PCM | 8x Ultra |
|---|---|---|---|
| 44.1 kHz | 88.2 kHz | 176.4 kHz | 352.8 kHz |
| 48 kHz | 96 kHz | 192 kHz | 384 kHz |
| 88.2 kHz | Kept, or handled per target | 176.4 kHz | 352.8 kHz |
| 96 kHz | Kept, or handled per target | 192 kHz | 384 kHz |
| 176.4 kHz | Kept | Kept | 352.8 kHz |
| 192 kHz | Kept | Kept | 384 kHz |
If the source already meets or exceeds the current target, ECHO may bypass processing. It will not re-process audio just so the UI can say “upsampling”.
Recommended progression
Section titled “Recommended progression”Off: troubleshooting, verifying bit-perfect candidates, confirming raw playback.2x PCM: lightweight test, good for weak CPUs or checking the chain first.4x PCM: recommended everyday starting point.8x Ultra: experimental tier; try only after confirming the DAC supports 352.8 / 384 kHz.
Do not jump straight to 8x Ultra. Higher is not “more advanced” — it is heavier on the computer and pickier about drivers and DACs.
Choosing a quality policy
Section titled “Choosing a quality policy”| Policy | Focus | Advice |
|---|---|---|
Balanced | Stability and cost balanced | Recommended for the first run |
Transparent | Higher precision, favors transparency and low distortion | Try after Balanced proves stable |
Low latency | Lower SRC overhead | For low latency, weak CPUs, or diagnosing stutter |
If you cannot hear a difference, that is normal. Upsampling is not an effects layer for every track. The settings worth keeping are the ones that stay stable over long playback, never break track changes, keep the device locked, and sound comfortable to you.
Confirming it is active
Section titled “Confirming it is active”Check these places first:
- Whether
Pathon the ECHO SRC page changed from waiting to processing. - Whether
Source sample rateandTarget sample ratediffer. - Whether
Engineshows the current SOXR / FIR / CUDA state. - Whether the
Bit-perfect pathindicator in the top right reports you have left bit-perfect. - Whether the DAC screen, driver panel, or sound-card control panel shows the target sample rate.
The DAC or driver panel display matters most. If ECHO requests 176.4 kHz but the DAC ends up showing 44.1 kHz or 48 kHz, there is usually shared mixing, driver resampling, or a device limitation still in the output path.
Why it is no longer bit-perfect when enabled
Section titled “Why it is no longer bit-perfect when enabled”Bit-perfect means delivering the file’s digital samples as unchanged as possible. Upsampling recalculates samples, so once ECHO SRC is actually processing, playback is no longer strictly bit-perfect.
This is not an error — it is an honest indicator:
- To verify raw output: turn off ECHO SRC, EQ, FIR, ReplayGain, channel tools, speed change, and other DSP.
- To use upsampling: accept that it changes the samples, and use the output state to verify the chain.
Using advanced mode
Section titled “Using advanced mode”Advanced mode exposes Filter / HQ-style, CPU/GPU Quality Ladder, Filter 1x, Filter Nx, Compute / CUDA, and PCM Dither / Noise Shaping options.
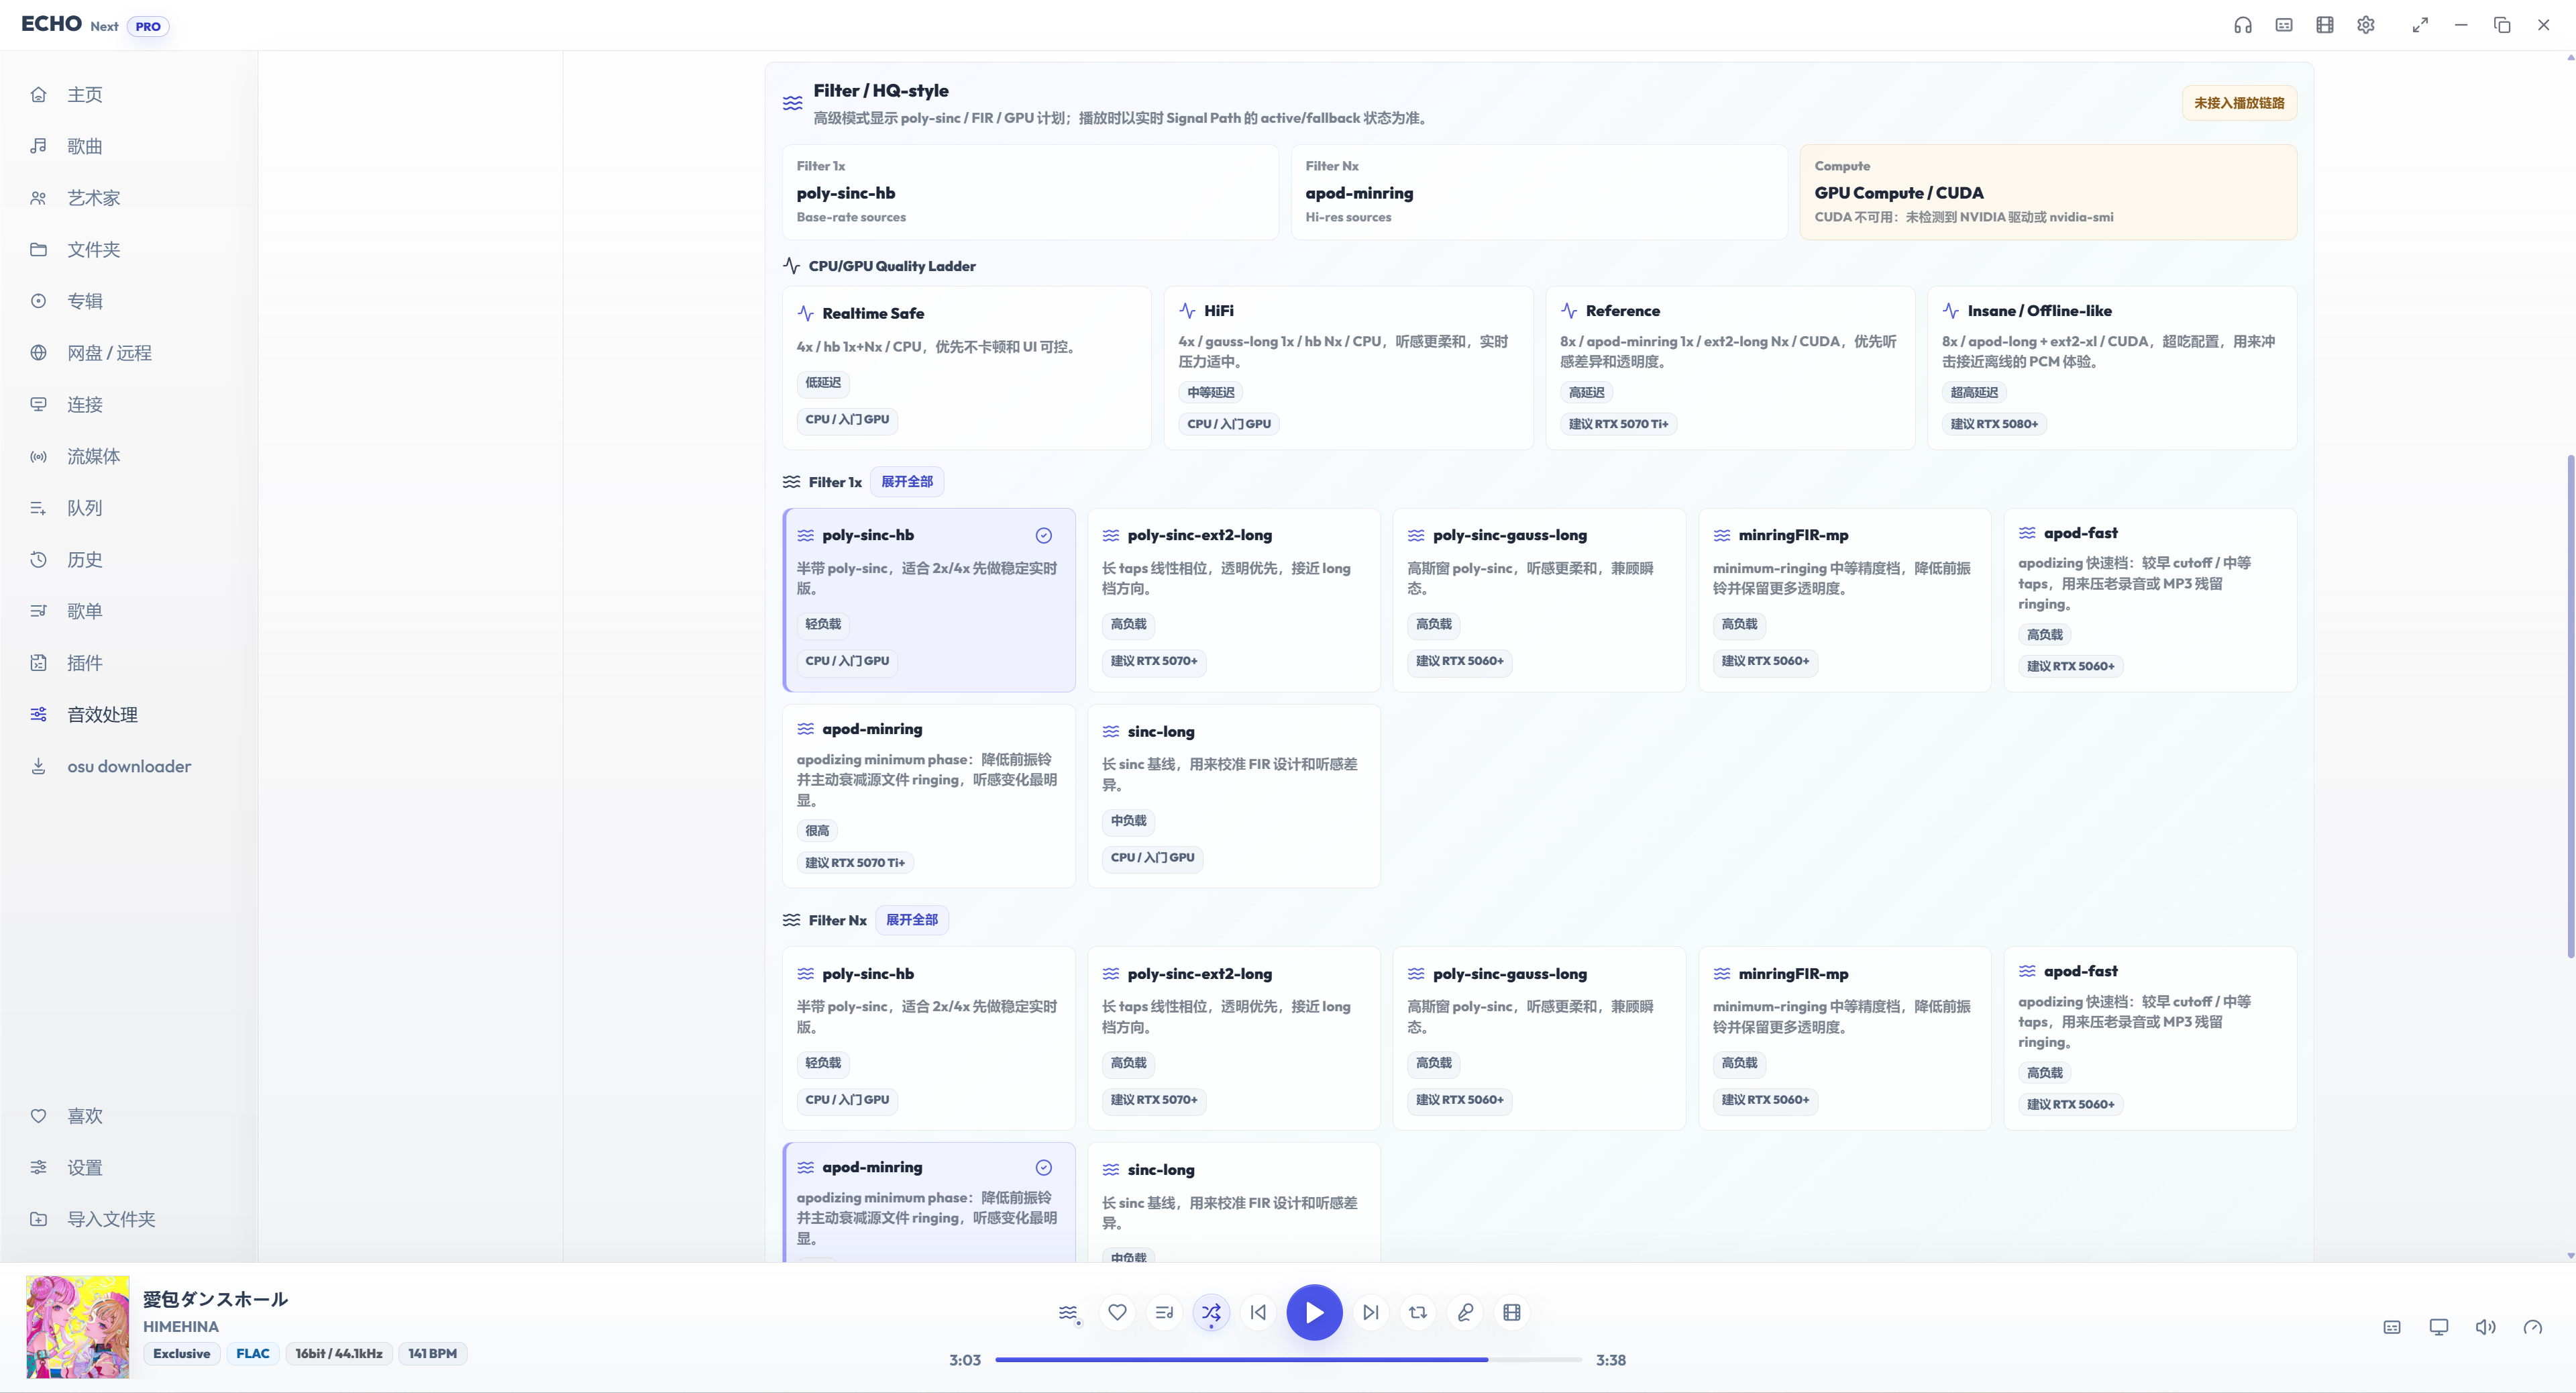
As a beginner, do not change these at the same time:
Filter 1xFilter NxCompute / CUDACPU/GPU Quality LadderPCM Dither / Noise Shaping
If you want to explore step by step:
- Run
4x PCM+Balancedin normal mode until it is stable. - Change only the quality policy to
Transparentand listen to the same track. - Then try
8x Ultra, confirming the DAC locks 352.8 / 384 kHz reliably. - Only then enter advanced mode and swap filters.
- Even with an NVIDIA GPU, do not enable CUDA right away. Get the CPU path stable first, then see whether CUDA is available.
If the UI reports CUDA unavailable, no NVIDIA driver detected, missing worker, or a fallback to CPU, follow the hint first. Low GPU usage does not mean it is inactive — real-time audio is often small low-latency workloads. Watch the active / fallback indicators in the playback state instead.
Plain-language guide to the advanced options
Section titled “Plain-language guide to the advanced options”| Option | What it does | Beginner advice |
|---|---|---|
Filter 1x | Handles base-rate sources like 44.1 / 48 kHz | Start with the default or a light option |
Filter Nx | Handles sources at 88.2 / 96 kHz and above | Keep it close to 1x at first, for easier troubleshooting |
Quality Ladder | Picks a whole quality/load profile in one click | Start from Realtime Safe or HiFi |
Compute / CUDA | Whether to attempt GPU compute | Only after the CPU path is stable |
Dither / Noise Shaping | Dithering and noise shaping for fixed bit-depth output | Keep the default if unsure; Float output usually does not need it urgently |
Advanced filter names look impressive, but the troubleshooting principle stays the same: change one variable at a time.
How to back out when things break
Section titled “How to back out when things break”| Symptom | Do this first |
|---|---|
| No sound | Turn off ECHO SRC, switch output back to System or WASAPI Shared |
| Pops / stutter | Drop from 8x Ultra to 4x PCM, then 2x PCM |
| Track changes noticeably slower | Turn off advanced filters / CUDA, return to normal mode |
| DAC does not show the target rate | Confirm the output is WASAPI Exclusive or official ASIO |
| Less stable with CUDA on | Switch back to CPU; retry after updating the NVIDIA driver |
| Bit-perfect indicator gone | Normal; turn off ECHO SRC to get bit-perfect back |
| No upsampling with DSD / HQPlayer | Normal; ECHO SRC does not stack with those chains |
Fastest rollback path:
Turn off ECHO SRC -> turn off other DSP -> back to WASAPI Shared/System -> play an ordinary FLACDon’t use it like this
Section titled “Don’t use it like this”Do not validate upsampling on Bluetooth devices. Bluetooth passes through the system stack, codecs, and a wireless link — unsuitable for sample-rate verification.
Do not crank the Windows default format to an extreme sample rate long-term and assume everything now sounds better. The system’s shared output and ECHO SRC are two different chains.
Do not enable ECHO SRC while diagnosing silence, pops, DSD, ASIO, HQPlayer, or remote library issues. Fix basic playback first, then play with upsampling.
Do not judge “better” by “louder”. When comparing before and after, keep volume matched and listen to the same familiar passage.
One-sentence summary
Section titled “One-sentence summary”Most users should use it like this:
- Keep it off day to day.
- To try built-in upsampling, use a dedicated DAC +
WASAPI Exclusive+4x PCM+Balanced. - Once stable, try
Transparent. - After confirming both the computer and the DAC can keep up, try
8x Ultraor advanced filters. - When things break, go back to
Off. Do not push through.
The point of ECHO SRC is a local PCM upsampling path that is explainable and reversible. Whether it works well for you depends on your compute power, your dedicated DAC, driver stability, and whether you genuinely hear a difference you enjoy over time.